Roti Hardness Diagnosis Tool
Step 1: How did you prepare the dough?
Select the option that best matches your process.
Cold Water Mix
I used cold water from the tap or fridge to mix the flour.
Warm Water & Quick Knead
I used warm water but only kneaded for a minute or two until it stuck together.
Skipped Resting
I kneaded well, but I started rolling immediately without letting the dough rest.
Perfect Process
I used warm water, kneaded for 8+ minutes, and rested the dough for 20 mins.
Step 2: How did you roll the roti?
Think about how much dry flour you used.
Heavy Dusting
I used a lot of dry flour (atta) on the board and roller to prevent sticking.
Uneven Thickness
Some parts are thick and some are very thin. It's not uniform.
Thin & Even
I rolled it out thin, evenly, with minimal extra flour dusting.
Step 3: How was the heat managed?
Consider the temperature of your tawa (griddle).
Low/Medium Heat
The tawa was warm, not smoking hot. The roti cooked slowly.
High Heat Only
Tawa was hot, but I didn't put it directly on the open flame.
Direct Flame
I used high heat and held it over the open gas flame to puff it up.
Step 4: How did you store the cooked rotis?
What happened after they came off the heat?
Left Uncovered
I stacked them on a plate and left them open to the air.
Wrapped Immediately
I wrapped them in foil or a cotton cloth while still warm.
Diagnosis Complete
There is nothing more disappointing than pulling a perfectly browned roti from the traditional Indian flatbread made from whole wheat flour and water pan only to find it turns into a cracker the moment it cools. You press it down, you flip it, you even blow on it, but once it sits for five minutes, it’s tough enough to break a tooth. If this sounds familiar, you are not alone. Making soft, pillowy rotis that stay pliable is one of the most common struggles in Indian home cooking.
The good news? A hard roti is rarely a sign of bad luck or inferior ingredients. It is almost always a result of a small mistake in the process-usually involving how you handle the dough or how you cook it. By tweaking just a few steps, you can transform your dry, brittle flatbreads into soft, fluffy masterpieces every single time.
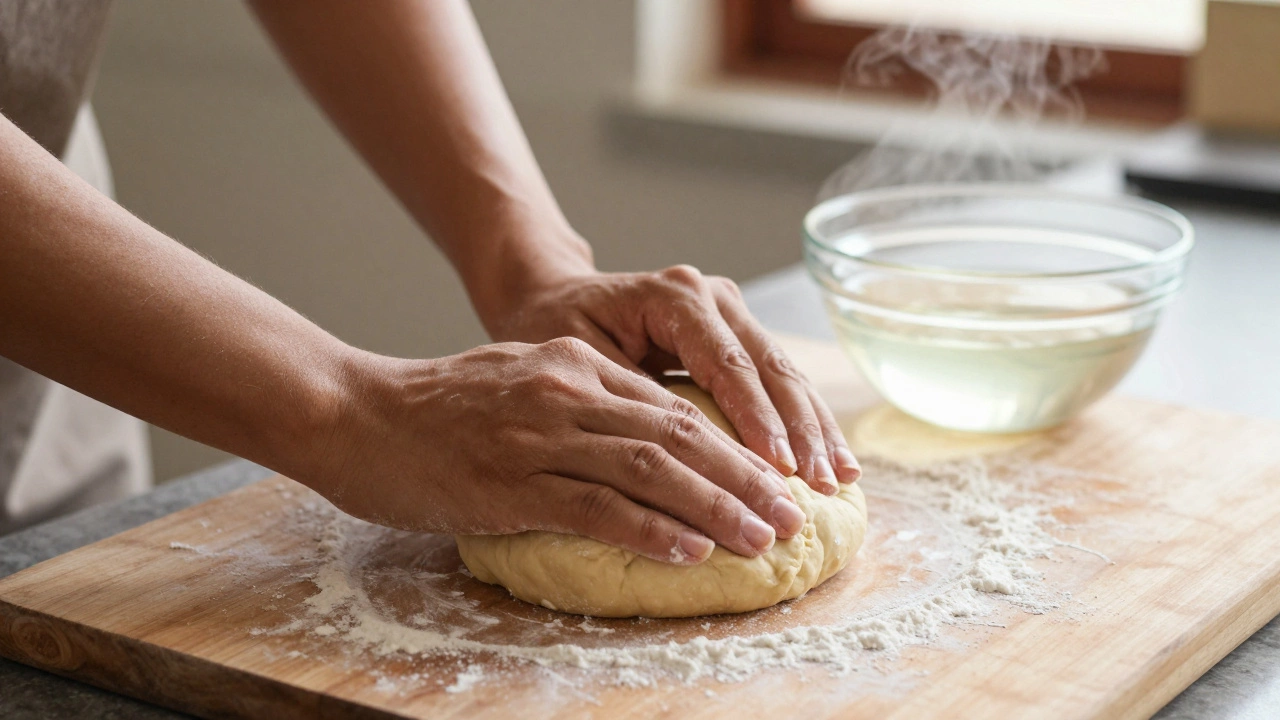
The Dough: Where Softness Begins
Most people think the secret to soft roti lies in the cooking stage, but the truth is, the battle is won or lost at the kneading table. The texture of your final bread is determined by the gluten network you build in the dough. If the dough is stiff, the roti will be hard. If the dough is sticky and under-kneaded, the roti will tear and burn. You need a middle ground: a smooth, elastic ball that feels like an earlobe.
Water Temperature Matters More Than You Think
Using cold water is the number one reason for hard rotis. Cold water keeps the gluten tight and resistant. When you use warm water (not boiling, just comfortably warm to the touch), it relaxes the gluten strands immediately. This makes the dough easier to stretch and results in a softer crumb structure inside the bread. Aim for water that is around 40-45°C (104-113°F). If you don’t have a thermometer, dip your finger in; if it feels pleasantly warm without burning, it’s perfect.
The Kneading Technique: Time and Effort
You cannot rush kneading. Many beginners mix the flour and water until it comes together and stop there. This leaves the gluten undeveloped. You need to knead the dough for at least 8 to 10 minutes. Yes, ten minutes. Use the heel of your hand to push the dough away from you, fold it back, and turn it. Keep going until the surface is completely smooth and no longer sticks to your hands. If you stop early, the roti will shrink back when you roll it out and become dense and chewy when cooked.
Resting the Dough: The Non-Negotiable Step
After kneading, cover the dough with a damp cloth or plastic wrap and let it rest for at least 15 to 20 minutes. This resting period allows the gluten strands to relax further and the water to fully hydrate the flour particles. Skipping this step means you are fighting against tight, springy dough that resists rolling. Rolled-out roti from un-rested dough will puff up poorly and end up hard because the internal structure is too tense.
Rolling Out: Thin and Even
How you roll the roti affects its ability to puff up. Puffing is crucial because the steam trapped inside separates the layers of the bread, creating air pockets that keep it soft. If the roti doesn’t puff, it stays dense.
- Avoid Excess Dry Flour: When rolling, dust your surface lightly with dry whole wheat flour (atta). However, do not overdo it. If you use too much dry flour, it absorbs moisture from the dough during cooking, leading to a dry, hard exterior. Try to roll the roti as thinly as possible without tearing it. A thin roti cooks faster and puffs more easily than a thick one.
- Uniform Thickness: Ensure the roti is rolled evenly. Thick spots will remain raw and doughy while thin spots burn. Uneven cooking leads to uneven texture, often resulting in hard patches.
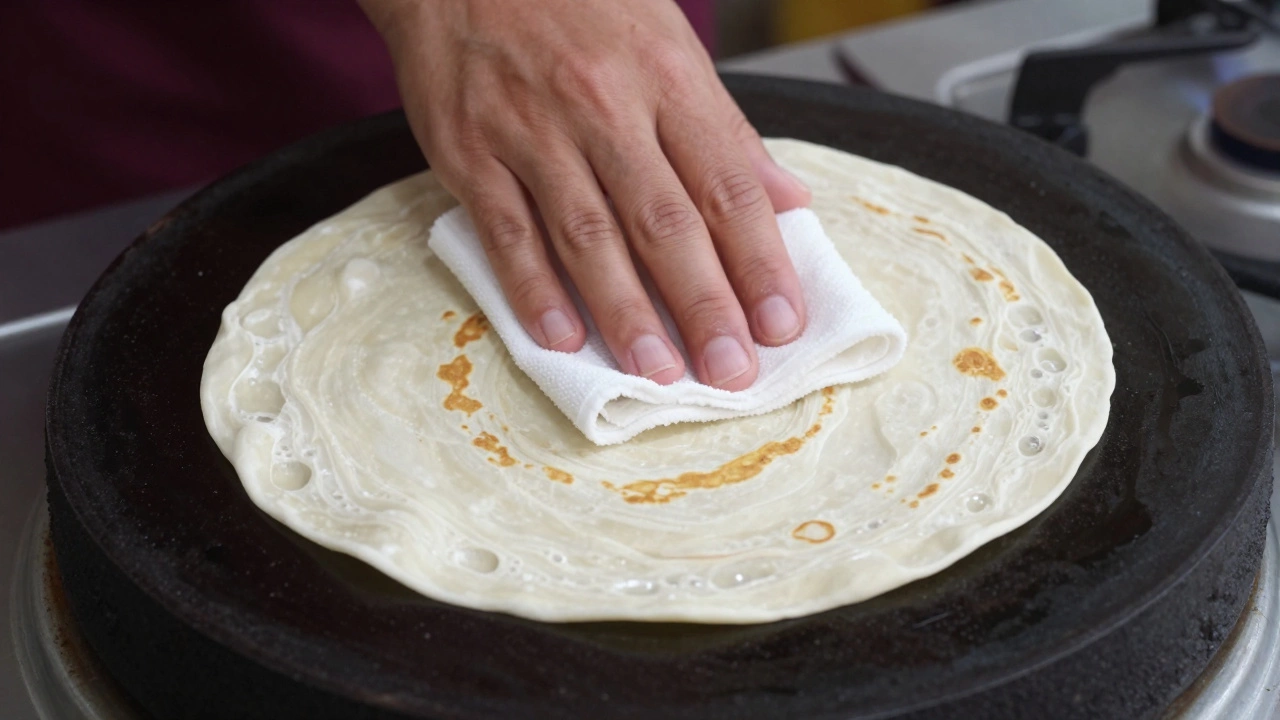
Cooking on the Tawa: Heat Management
The tawa is a flat griddle used in South Asian cooking is your best friend, but only if you manage the heat correctly. Most people make the mistake of using medium heat. For roti, you need high heat. High heat creates an immediate burst of steam inside the dough, causing it to puff up rapidly. Low heat dries out the roti before it has a chance to expand.
- Preheat the Tawa: Place your heavy-bottomed tawa on high heat and let it get hot. To test, sprinkle a few drops of water on it. If they sizzle and evaporate instantly, it’s ready.
- First Side: Place the rolled roti on the hot tawa. Wait for bubbles to form on the surface. This usually takes about 30-45 seconds. Once you see large bubbles, flip it.
- Second Side: Press gently with a kitchen towel or spatula to encourage puffing. Cook for another 20-30 seconds until brown spots appear.
- The Flame Trick: For extra softness, transfer the roti directly onto the open flame of your gas stove using tongs. Hold it there for a few seconds on each side. The direct flame forces the remaining moisture to turn into steam, puffing the roti like a balloon. This step is critical for achieving that restaurant-style softness.
Post-Cooking Care: Trapping the Steam
Even if you cook the roti perfectly, it can still go hard if you leave it exposed to air. As soon as the roti comes off the flame, it starts losing moisture. To prevent this, you need to trap the residual heat and steam.
The Aluminum Foil Method
Keep a stack of cooked rotis wrapped in aluminum foil or placed inside a clean, dry cotton cloth. As soon as one roti is done, place it on top of the others inside the wrap. The warmth of the previous rotis keeps the new one soft, and the enclosed environment prevents moisture loss. Never stack rotis while they are piping hot without a barrier, as they will stick together. Let them cool slightly for 10 seconds before stacking, or use parchment paper between them if you prefer not to use foil.

Ingredient Checks: Is Your Flour the Culprit?
Sometimes, despite perfect technique, the issue lies in the ingredients. Not all whole wheat flours are created equal.
| Flour Type | Protein Content | Texture Result | Best For |
|---|---|---|---|
| Standard Whole Wheat Atta | Medium (~11%) | Soft, pliable | Daily rotis, chapatis |
| High-Protein Wheat Flour | High (>13%) | Chewy, tough | Pizza crusts, naan (sometimes) |
| Multigrain Flour | Varies | Dense, hard if not hydrated well | Health-focused meals, requires extra water/oil |
If you are using a multigrain blend or a high-protein wheat flour, you may need to adjust your water ratio significantly. These flours absorb more water. Also, adding a teaspoon of oil or ghee to the dough itself can help tenderize the gluten, resulting in a softer roti. This is especially useful if you live in a dry climate where moisture evaporates quickly.
Troubleshooting Common Issues
If your rotis are still turning out hard, ask yourself these questions:
- Did I use enough water? The dough should be soft, not stiff. A general rule is a 2:1 ratio of flour to water by volume, but adjust based on humidity. In dry places like Auckland winters, you might need slightly more water.
- Was the tawa hot enough? If the roti browns slowly, your heat is too low. Increase it.
- Did I skip the flame step? Direct flame exposure is the easiest way to ensure puffing and softness.
- Am I storing them correctly? Leaving rotis uncovered on a plate guarantees hardness within minutes.
Remember, consistency is key. Once you find the right balance of water, kneading time, and heat, making soft roti becomes second nature. Don’t get discouraged if your first few attempts aren’t perfect. Every batch teaches you something about your specific flour and kitchen environment.
Can I add yogurt to my roti dough to make it softer?
Yes, adding a tablespoon of plain yogurt to the dough can help tenderize the gluten due to its acidity. However, use it sparingly as too much liquid can make the dough sticky. Yogurt works best for parathas rather than simple rotis.
Why does my roti shrink when I roll it out?
Shrinking indicates that the gluten is too tight and hasn't relaxed enough. This happens if you didn't knead the dough long enough or if you skipped the resting period. Let the dough rest for at least 15 minutes before rolling.
Is it okay to use vegetable oil instead of ghee in the dough?
Absolutely. Adding a teaspoon of neutral vegetable oil or olive oil to the dough helps keep the roti soft. Ghee adds flavor, but oil is effective for texture and is suitable for vegetarian and vegan diets.
How long can I store cooked rotis?
Cooked rotis can be stored in an airtight container in the refrigerator for up to 3 days. Reheat them on a hot tawa with a little water sprinkled on top to restore softness. They can also be frozen for up to a month.
Does the type of tawa affect the softness of the roti?
Yes, a heavy-bottomed cast iron or non-stick tawa retains heat better than thin stainless steel pans. Consistent high heat is essential for puffing. If your tawa heats unevenly, the roti may cook patchily and become hard in some areas.